Saturday, October 22, 2011

Monongahela Patrol 1756

Braddock's defeat was a year old and once again British forces set out to reduce Fort Duquense.

Leading the way was Sergeant Regan and a six man scout from his regiment:

Sergeant Regan Rep 5
Corporal Carter Rep 5
Pvt. Baker Rep 4
Pvt. Caine Rep 4
Pvt. Howard Rep 4
Pvt. Hoskins Rep 3
Pvt. Stratham Rep 3

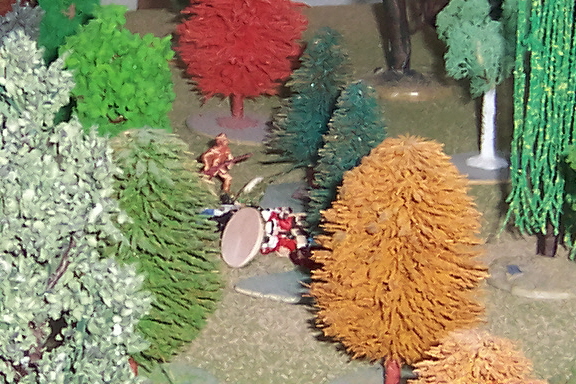
Having crossed the river, Regan thought he saw a glint of metal off to the left. He duly sent Carter and Howard to investigate.

The two men discovered a party of 5 warriors concealed behind an embankment. Carter was able to get off a shot before the warriors but to no avail. The following Indian volley left Carter down and stunned.

Successive Indian volleys killed Howard while Carter was able to regain the safety of the patrol.

In a disturbing development a mixed band of Canadians and Indians emerged from the embankment and proceeded to move around the patrol's right flank, in an apparent bid to cut off their retreat.

Now taking fire from two directions Regan's men faltered.
Regan was able to rally his men and their fire halted the Canadian warband at the far side of the trail.

Faced with twice his number of fighting men, and with enemy to front and flank, Regan decided to withdraw.
Accordingly he sent Carter with Caine and Hoskins across the river, while the Sergeant, Baker, and Stratham held the enemy at bay.
Seeing this the warriors from the embankment crept forward to take the patrol under fire.
Regan and co. were able to discomfit the Canadians on the flank, causing one to run. Unfortunately Stratham's firelock fouled, cutting the detachments firepower by one third unless he could repair it quickly.


Meanwhile Carter's men took the approaching Indians under fire in an effort to cover Regan's withdrawal across the river. In the ensuing firefight, Caine was severely wounded as was Carter but not before Carter had killed an Indian in the act of scalping Howard.

The carnage proved too much for Hoskins who grabbed the wounded Carter and made for the safety of the British camp.

As Regan and co. were preparing to make their dash across the river, Stratham took a musket ball that laid him low. To Regan's (my!) discredit the wounded Stratham was left behind as Regan and Baker crossed the river.

Fortunately for Regan, Baker, and the wounded Caine, the Indians and their Canadian allies did not pursue.
Final losses for the British were Howard KIA, Statham, missing and presumed dead, Caine and Carter WIA. Caine did not last the night. Carter is expected to rejoin the ranks in a month or two.

In return two warriors were killed and one run off.

With an unsuccessful mission and a wounded man left to the "mercy" of the savage foe, the personal loyalty Carter enjoys from his men has taken a hit as well.

For the moment the dense wilderness of the Ohio country remains safely in French hands.

Tuesday, October 18, 2011

Braddock's Battle 1755

To "celebrate" having found my French and Indian War figures, I staged a very watered down version of Braddock's defeat on the Monongahela in 1757. Forces were roughly 1 figure equals 100 men, giving the British about 10 regulars and 4 militia, and the French about 3 French and 7 Indians. Hardly the stuff of epics but enough for a good skirmish game.
The British advanced guard of 3 figures ran into the French coming the other way along the trail. A sharp shooting Troupe de la Marine figure wounded one and stunned the other two. A nearby courier de bois could not resist the sight of helpless red coats and moved in to finish them off.
Meanwhile the remaining courier de bois and the Indians fanned out in the woods along either side of the British main body.
Advancing along the trail, the British regulars formed line and fired a volley at the French lingering about the remains of the advance party. The Troupe de Marine figure bought the farm.
While the regulars were reloading I had the Indians charge the column. Not really the best move as the main body was not at all discomfited so far and while two of the Virginia militia bolted, the rest of the troops were able to fight off the assault with some loss.

A quick game I lost as the French due to impatience. It would have been much better to wear the regulars down with fire and only emerge onto the path to finish off the survivors at the very end. Oh well c'est le jeu de guerre!

Thanks for stopping by.

Sunday, October 16, 2011

Plains War for Din of Battle 1st Edition

Been a dearth of posting lately as I try to get Muskets and Mohawks 2 out the door so thought I'd post this older material.


Below you will find the modifications I used for the gaming the Plains War using Piquet and Din of Battle first edition. Used these rules for a number of historical fights from Fetterman, to Beecher's Island, and of course the Little Big Horn with very good results.


Haven't seen the current edition of Din of Battle so cannot say how they would work with the newer version.


Let's begin:


Pardon the photo quality. It's an old camera. Well it is now but was not then!
There are notable differences between the Plains Warrior’s method of waging war and that of the soldiers. My intention is to highlight those differences while staying largely within the framework of the PK/DoB rules. There is always a temptation to create “special” rules for this or that situation, but if that were done to represent the minutia of each period the rulebooks would double in thickness and speed of play would suffer.

The usual pattern of a hostile attack was a quick attempt at rout by mounted charge, followed by dismounted skirmishing to disrupt, demoralize, and by stampeding horses, demobilize the enemy. Attempts would be made to lure the troops into spreading out while the hostiles would use their superior mobility to overwhelm any detachment that found itself isolated. A charge, usually mounted but not always, would seal the fate of any unit considerably reduced in fighting power by the skirmishing. Truly being groups of individuals, the warrior bands would be difficult to coordinate en masse, but individual bands could usually be depended upon to act appropriately, i.e. don’t sit around on your horse being shot at, don’t frontally charge a line of well ordered troops, do move around the enemy’s flank, do withdraw in the face of a charge in order to draw out the troops.

The 3/0 command rating for the Sioux is spot on for representing the difficulty in coordinating a force’s actions. Other areas of the Sioux list could stand discussion.

Based on this model I would suggest changes to reflect the following points.

Despite the Hollywood image, by the mid 1870’s, while individual warriors might “circle” the troops on horseback as a show of bravery, most warriors would dismount and skirmish with any determined opposition.

·        Add two more Deployment cards to the Sequence deck. If it is necessary to keep the basic deck at 32, remove 2 Milling Around cards.

An individual warrior, being trained for war since birth, would probably prove superior to the average trooper in melee. However a group of warriors, truly a group of equals fighting along side each other by choice and free to seek safety as individual conscience dictated, were not a match for an equal number of relatively disciplined soldiers in melee. The historical record shows instances of weakened or demoralized troops being overrun by hostiles. Also in evidence are cases of hostiles routing troops from flank or rear. But instances of hostiles defeating organized troops in frontal melee are rare (actually I can’t recall any, but hate to say “never.”)

·        Change the Sioux troop type from Native to Militia (down 1 in melee.)
·        Do not allow Indian mounted troops to melee dismounted skirmishers without a melee card. Mounted units that would otherwise have been eligible to melee dismounted skirmishers may attempt to count coup (see below) on an appropriate movement card at a cost of one pip per unit.


The Plains warrior being by nature a hunter was probably the equal (some say the superior) of the soldier in terms of marksmanship. The Native Americans’ main constraint viz. firepower was uncertain supply of ammunition. Read just about any account of a fight between federal troops and hostiles and you’ll be impressed with just how poorly the frontier regulars handled their weapons. Some historians lay the blame on Congress. Apparently the government failed to provide funds to allow for sufficient expenditure of rounds in target practice.

·        Here I’m not sure of the design intent. If rating the cavalry as elite (up 1 for fire) vs. the Sioux as Native (down 1 for fire) represents the U.S. forces’ greater supply of cartridges for use in battle than perhaps no change is warranted. However, as noted above, I advocate changing the hostiles to Militia (NC for fire.) If ammunition supply is not being modeled than change the U.S. cavalry from elite to line.

Mobility, more than combat prowess, was the main strength of the warrior bands. It seems that if the federals’ left an opening on a flank, the hostiles would find it and infiltrate it. This penchant for infiltration made any movement by small bodies of troops, particularly retreats, hazardous undertakings.

·        Add one more Maneuver card to the Sioux sequence deck.


Finally, I feel that more detail is required to show the difficulties facing dismounted cavalry. A large part of the hostiles’ attention was devoted to separating the soldiers from their horses. That’s not very surprising if you consider that the Plains warrior’s main weapon was mobility.

·        In regard to horse holders U.S. and European armies generally assigned one man in four to hold the horses when the troop dismounted. This reduction of the firing line, and consequently of the beaten zone as well, is easily represented by retaining one stand of troops mounted. The mounted stand represents the horses and holders and should be placed to the rear of the unit. The horse holders may move with the troop at the dismounted rate.  According to Upton’s 1874 manual of U.S. Army Cavalry Tactics, the horse holders were to be placed in an area behind the firing line to be used as a reserve. If a dismounted troop receives fire from the flank or rear, the horse holders may be specifically targeted. If a stand loss is required that troop is no longer able to remount as the horses have been stampeded.

·        The Plains warriors (as, if I recall correctly did the Boers) used non-combatants to tend to their horses when they dismounted. A riderless horse or perhaps one of the mounted figures can be used to represent the location of the horses. This has the advantage of allowing all four stands to take their place on the firing line. The downside is that the horses themselves may not move. Lines of sight permitting the riderless horses may be targeted by the enemy, two hits sufficing to scatter the herd.

Other changes to the sequence deck (added 3/2000):

In the late 1860’s and early 70’s the increasing availability of breech-loading weaponry began to effect the tactics of both soldier and warrior. The changes to the sequence deck outlined below reflect how the availability of modern firearms altered the art of war on the plains.

1.      For the US, reduce the number of Missile/Musket Reload cards to two. Add one Breech-Loader Reload card. This will have to be home made or substituted from one of the other cards.

2.      For the Sioux, add a Breech-Loader/Bow Reload as well as an Elite Reload card. Remove two Milling Around cards. The absence of an Elite Reload from the Sioux deck must have been an oversight as this army is allowed elite troops.

3.      Note that unlike carbine armed troops, mounted bow armed troops may reload on Musket/Missile Reload and/or Breech-Loader/Bow Reload cards without penalty.

4.      Players might also want to use the indirect bow fire rules from Archon or BoB to allow bow armed Indians to fire at soldier positions from behind intervening terrain features.

5.      Replace 2 of the three Melee Resolution cards in the Sioux deck with 2 Count Coup cards.


When this card is drawn, the player must pay one pip for each unit within 8 inches of an enemy unit as enthusiastic individuals ride/run out from the warband to perform feats of daring to prove their prowess.

The warband unit does not itself move. The majority of the unit will be waiting and watching the deeds of their dare devil brethren.

The defending unit will fire if loaded. This fire does not require an opportunity fire chit. Range is determined as in the opp fire rules with firing troop quality determining the range at which fire is taken. Consider the targets to be closing from the parent unit’s position. This fire can only effect the coup counters, not their parent unit. A loss of one or more stands will end the attempt at counting coup. The warband will suffer no adverse effect. If the firing unit was armed with muzzle-loading weapons, mark that unit as fired. They will need a reload card before they can fire again. If the unit was armed with breech-loaders or repeaters, it retains its loaded status.

If the coup counters survive the opportunity fire they will fight one round of melee (at no additional cost) with the target unit. Consider this a straight roll of the two units’ melee dice. Consider the advantages of charging to be cancelled out by the numbers of the defenders. The numerical advantage of the defenders is cancelled out by the sheer audacity of the “attacks.”

If the Coup Counters win the melee round, the defending unit is disrupted and must surrender a morale chip. If already disrupted, a morale chip is still lost but the defending unit is not routed. No stands are ever lost to coup counters but a dismounted cavalry unit will lose its mounts if it loses a coup counter melee. Consider the braves to have so spooked the mounts with eagle bone whistles and waving blankets that the horse holders are unable to control their charges and the mounts bolt.

If the coup counters lose the melee, they are considered eliminated. The Sioux player must surrender a morale chip but suffers no other adverse effect as the coup counters are deemed to be a very small portion of the warband’s number.

Note that I have opted not to charge the hostiles a morale chip if the coup counters are laid low by gunfire, only by melee. If the coup counters were driven off by gunfire, we may assume that the individuals were killed, wounded, or simply thought better of their actions and returned to their units. While this may or may not have a negative effect on that individual’s power or medicine, I deem this not to significantly undermine the unit’s or tribe’s morale as a whole. Losing the melee on the other hand, shows the unit that their bravest warriors were no match for the foe in close combat, a very disheartening revelation indeed for the surviving braves, and thus worth the loss of a morale chip.

As you can see the act of counting coup can set up opportunities for the rest of the hostiles to charge and melee the newly disrupted units, as well as drain precious morale chips. At the same time coup counting is quite dangerous and later in the period, when breech-loading weaponry is readily available, will often come to naught.

·        As one final note, consider carbines to have one half the range of their long rifle counterpart on the Weapon Adjustment Table. Thus a Trapdoor Springfield carbine would have a Point Blank range of 0-5”, Short 5”-9”, Medium 9”-12”, and Long 12”-16”.

I look forward to discussing these ideas with any interested parties. Sources can be provided but I didn’t want to add to an already long post.

1998
Coup rules, some changes 2000


Guideons suitable for wargaming

Thursday, September 29, 2011

Musket and Mohawks 2 Field Battle

 Was able to test the largest encounter in Muskets and Mohawks 2 today, The Field Battle. In this encounter your company takes its place in the line of battle during a field engagement. The game is still played at 1 figure equals 1 man scale and the game shows only that part of the battlefield directly to the front of your company. 

A full game company consists of 1 Captain, 2 Lieutenants, 2 Ensigns, a Sergeant Major, 4 sergeants, 8 Corporals and 40 other ranks. That's all four sections of your company plus the command element.

Now as it happens I do not have nearly enough period figures for this large a game and so substituted Napoleonic troops for this game. My company would be French line while the opposition were Prussians. Also while I say "my" company, my character was in fact the Lieutenant of second platoon. The Captain was a non-player character as were all of the Prussians.

The battle featured a French attack so the Prussian company deployed on table and my company entered from the opposite long edge. 

Due to some random events my company received an order to halt our advance while still out of musket range of the enemy. While waiting for our advance to resume I lost two men to cannon fire, another random event.
 We were finally able to resume the advance! Unfortunately the Prussians were able to get in the first volley and dropped several of my men.
 The senior section of my company was obscured by a small cluster of trees on our right, which offered them cover but also prevented them from bringing all of their firelocks into play. 

One aspect of this game that I am very proud of is the way it presents you with the problems of the black powder battlefield. In larger scale games columns just move faster than lines. At this level you see the terrain that causes lines to break up and move more slowly than columns. As it is a company would always form line unless navigating tight terrain, and here rather than disrupt my formation I decided to just keep the senior section out of action for a bit.
 We began a brisk exchange of fire with the Prussians. Slowly we began to achieve the upper hand, inflicting more casualties to the Prussian leadership than we received in return. This was all down to the luck of the dice.

Another aspect I am pleased with is the frequency of misfired. Initial vollies are very powerful and then fire sort of goes in spurts as casualties and misfires contribute to a decline in the volume of fire. Eventually misfires are diagnosed and repaired and some of the casualties return to the firing line, and volume of fire picks up for a while until the inevitable misfires and casualties reduce it and so on.
 Eventually one of the Prussian platoons had suffered too much and withdrew behind the firing line.
 The company sergeant lost no time in attempting to rally them. Here then was my chance! Our company commander ordered the charge. However he had considerable difficulty bringing the men under control and they continued to stand and fire.

Once troops begin to fire it is sometimes difficult to bring them back under orders. In this case I had considerable difficulty bringing them to heel.
 Fortune smiled as a half section of light infantry was sent to our aid. They took up position in the wood in front of the senior section and opened an accurate fire on the Prussian left.
 At about the same time the Prussians suffered a couple of round shot from our artillery. Random events can cut both ways. 

To their credit the section that had retired returned to the line for more punishment.
 Still unable to get our men to move  I was bit disconcerted by the arrival of a Prussain gun behind their lines. Clearly the higher command could sense the weakening of Prussian resolve and sent the gun to stiffen the line.

Reinforcements can be granted via random dice rolls. Like random events they cut both way too.

 It was a race against time now. Our fire had significantly weakened the Prussian company and individuals were starting to slip away from the firing line. .
Their sergeants managed to whip most of them back into line but in ones and twos some headed for the rear
 The Prussian deployed the gun behind their line. Presumably they would retire behind the gun once it was loaded.
...And still our Captain could not bring the men under control. Our fire was to good effect but if that gun started hitting us with canister we would be in a bad way.

 Finally our men were brought under control. Our firing line went silent as the officers and sergeants dressed the ranks. 

Only the sniping of the light troops continued and the Prussian fire grew increasingly ragged.

 At last we began to advance. Avant!
 When charging the attacker moves to only 6" from the enemy. Opposed dice rolls are then made to see if the attacker baulks, takes fire at close range, or the defender stands for melee (rarely) or legs it.
 The Prussian line evaporated before our advance!
 The day was ours.
Final losses were 11 French other ranks. The Prussians lost more than twice that many and the gun.

Post battle rolls should see my character gain some recognition. Had we lost he might have had to fight a duel if brother officers were to cast aspersions on his conduct. However as one of the victors he may be able to grab some of the glory.

Hope you enjoyed the report and thanks for stopping by!

Tuesday, September 20, 2011

Giglamps' Impi

Giglamps has committed a near unforgivable sin. Grievously injured though he survived the greatest disaster to strike His Majesty's troops in Afri.

Worse yet, some have insinuated, nay outright stated, their belief that Giglamps was not acting under the orders of the late Lt. Col. Lugdush of the 21st Eyes N' Gourds when he departed the field of the Fords of Isandlwana. No, so they say, Lt. Giglamps grasped the Kyng's Colour of his own accord in a craven effort to save his life!

Giggers could stand the backhand glances and snide comments of hi "Brovver" officers. That was only to be expected. However when he received the White Fang from his intended. Miss Abigal Goodtrhashing it was all too much to bear.

No~ This would not stand and so he resolved to recover the Colour lost at Fugitive's Drift of die in the attempt. After recovering from his injuries he set about infiltrating the Halfling Impis. In "Sproglets' Own" fashion he lost no time in learning the Halfling's speech and altered his appearance so that he might move about them undetected...if a bit awkwardly as he had to leave his spectacles. a sure sign of his civilized nature, behind.
Giglamps gone Halfling
Above is a simple conversion of an Alternative Armies Orc to stand in for Giglamps as he move about Afri like the very wind...

Added an Iklwa made from pressed florist's wire and a card and florist's wire shield. Ended up repainting most of the old boy to repair damage to his original paint job sustained during modification.

More on his adventures in future installments.

Thanks for dropping by!