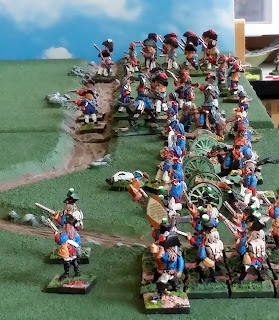
As evening falls, Der Kleine Fritz tours the field, having asked Hauptman Muller to show him the site of his heroic melee.
In the background camp followers tend to loved ones, looters loot, and howls announce the first scvangers appearing in the distant woods
A while ago I was asked to write a post about how I photograph my posts. My first answer was that truthfully I don't really know.
However, having now paid attention to what was being done, I think some readers may find some tips or at least interest in the following.
This will by its nature be a photo heavy post.
Equipment and Technical Details (as if!)
I make no claim to knowledge of cameras and equipment.
I first started photographing miniatures with my daughter's Barbie Digital Camera. The photos were of woeful resolution but the ability to tell a story through images was addictive.
Over the years I have purchased a few digital cameras for my dear lady wife to use while on vacation...always making sure they had something called a "macro" what would allow for close up photographs of small objects!
Well technology is always improving and now I have found that the camera on my phone, a Samsung Galaxy Note 3, is more than sufficient for my gaming needs.
So the first and most obvious tool is a digital camera!
Second and nearly as important is a good tripod. Modern cameras have an amazing ability to dampen the effects of user motion when taking pictures but it is still not the same as a truly stable platform.
For very close up photos, it's easy enough to hook one's little fingers underneath the camera and so, resting them on the table make a stable platform, but for those sweeping shots of the table, only a tripod will do.
Real photographers and enthusiasts will know all about lighting and what implements are best for such and such a setting. I do not.
I try and play during the day. My game room has a northern exposure and I often augment the lighting with two floor lamps turned up high. Depending on the qualities of your camera just the two lights might well be enough for night time shooting.
Do NOT enable the flash. Sounds good in theory but almost always washes out the subject and gives a very artificial effect.
Finally a word on editing software. Very useful indeed as the following photos will show. In the past I have used programs such as Photoshop. In the end though I have settled on Windows Photo Gallery of all things. Very simple to use. Allows simple touch ups, cropping, sharpening, etc. Not as nice results as the more advanced programs but, as they say round here "helluva" easy to use.
Shooting (Sham) War
Be prepared to take a lot of pictures. Fifty or more per blog post is not unusual in my experience, although the number you will actually upload will be much smaller.
In order to tell the story of a game, it is essential to present some sort of overview. To be honest these are usually neither the most absorbing, nor gripping shots but they do give your reader a general idea of what is going on down on the table.
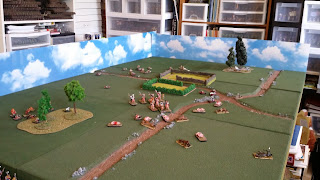
Above you can see an untouched photo of the table. The terrain tiles cover and area 4 foot by 6 foot to give an idea of scale. In the background one can see my various storage systems, piles of rules, and frankly the detritus - like impedimenta of the hobby. Not very attractive is it?
Here then is the cropped and cleaned up photo. Still a bit of background above the clouds upper left but not so much that it detracts from what is going on the table, or so I hope. We can clearly see the officer group in the center, and some sort of activity to the left, upper middle, and perhaps upper right. Casualties are evident in the foreground right, and lower right.
Which brings up the next point: depth.
Somewhere in the dark days of my education I was told that pictures have a foreground, a middle ground, and a background.
If you are standing outside looking over a field for example, and divide your view into three evenly spaced horizontal lines you will see what I mean. The foreground is close you you, the background out much further to the horizon, and the middle ground, well, in the middle.
It is said that pictures are more interesting and look more natural with objects in all three bands. They do for this author in any event!
Here we see His Highness mid ground framed by casualties and rocks foreground, and hedges, officers background.
Getting back on track, having established the setting with an overview shot or two, we can now look at some vignettes to tell our story.
Here we see intrepid looters facing off against hungry scavengers.
This shot has obviously been taken at some distance and while it could be used as is, here is how I would choose to present it:
This view focuses the viewers attention on the drama being played out on the table. I suppose the empty space center photo is a bit of an issue but for me, that space speaks of room for impending action, thereby helping to develop tension.
Our next vignette shows a series of photos taken, all to be discarded but the last. Or course they are all shown here for example's sake.
This, could be tightened to show...
...this. Yet that is not the distant effect I am after.
Perhaps a peek through the wood?
No, I shouldn't think so.
Around the back then?
Better?
Even better?
There it is. Camp followers among the fallen.
Poignant scene of familial distress or disturbing scene of callous looting?
That is for the viewer to decide barring descriptive text.
Again notice there is a foreground, mid ground, and background to give a sense of depth to the whole.
Much less action oriented than the looter vs. scavenger photo but intriguing none the less to my view.
Finally what about showcasing a particular figure?
This can be quite frustrating as sometimes your camera may seem to have a mind of its own, preferring to focus on a busy background rather than the figure right in front of it.
The answer here is a bit counter intuitive. If your figure seems blurry in the photo, move your camera back until the figure IS the focal point.
You can always crop it afterwards. This is the After Action Report version of the film maker's fall back..."We'll fix it in post".
Who the devil is THAT fellah?
Ready for his close up, Mister DeMille.
Solutions to Common Problems (or How to Make the Best of a Bad Situation)
The observant will have noticed the sky background edging the table. I like this one because its a.) better than nothing, and b.) universal.
Used to have my game table in a much larger room and at that time I had painted the walls sky blue with some clouds. Thought that was pretty effective.
I have seen others with much more talent than I paint superb backgrounds with rolling hills, villages, and roads stretching off to the horizon.
Also model railroad hobby suppliers offer such backgrounds although most have the odd telegraph pole or some such other modern inconvenience printed on them.
Worse comes to worst you can't go far wrong suspending a bed sheet of a reasonable shade beyond your table.
For ease of access I keep my backdrop low, and only on two of the table's four sides.
So what is one to do when the right shot at the right angle just doesn't line up with your backdrop?
Trim
it down
of course!
Look closely upper right and you can see the edge of the sky.
Still it gives a nice view of the command group.
And zooms in nicely on Hauptman Muller and his colour.
Simply moving the back drop is another option naturally. Personally I find that a bit cumbersome and and would rather work my shots around it than vice versa.
With the advent of the "wide screen" 16x9 format cameras we can now include panoramic views that in the past required stitching multiple images together.
This is really handy for giving a sense of sweep and scope.
It can also be used to take rectangular up and down shots thus:
My advice, as Tow Mater so aptly put it in the big screen epic "Cars" is "to not to".
They are a bit disorienting.
Still on occasion, one may be pressed by a table's edge.
In that case...
Fix it in post!
Or look for another angle!
Some Final Thoughts
Well that's about it really.
Camera,
Tripod.
Composition,
Foreground
Mid ground
Background.
Overview,
Vignettes,
Close ups.
Take a lot of photos.
Fix the best.
Discard the rest.
Most importantly,
Experiment,
And have fun with it.
So that is a look at the process of photographing sham battles.
Hope some of you found something useful to take away,
and if you have read this far,
as always,
Thanks for stopping by!


