Thursday, November 14, 2013

D'Erlon's Assault with Muskets and Shakos: Part Three: This is the End...

Hello!

If you are just catching up here the links to 


and


To spare you the suspense...


...you may be assured that the web of history remains intact despite my best efforts.

The end of the battle will be presented in photos below but first a word about the wherefore and such like.

As many have written, D'Erlon's deployment was too close to allow following battalions room to react to the head of each brigade having been run down by cavalry. But that is not all there is to it and D'Erlon's deployment did what it was intended to. Bear with.

It was only the closeness of the deployment that let me take the ridge in the first place. As each lead battalion was worn down it was an easy matter to bring fresh troops to the front. This in turn made it impossible for the Allies to hold the hedge for French numbers in a very short span of time were just too great. 

No other deployment would have allowed reserves to have been brought up so quickly.

The charge of the heavies occurred exactly when it needed to in order to catch the heads of the French brigades at a great disadvantage. 

What steps might have been taken to minimize the damage? As some have suggested Donzelot and Marcognet may have held their 2nd Brigades back to form a back stop if you will. These battalions would have had time to form square and provide a nucleus around which the other troops could rally.

However this presupposes that D'Erlon knew that a single brigade from each division would have been able to reach the ridge line as Bourgeois had and then been able to hold until relieved by a second line.  IMO that would have been a bit of a gamble and the Count could easily have been pilloried after the fact for not having committed sufficient troops to the initial assault,

The one variable that I  introduced in this situation was of no avail to the French cause. Keeping the 1st and 4th cuirassiers fresh did not change the outcome at all. A proper general may well have been able to use them to better advantage of course. As it was the field was too crowded with troops, La Haye Sainte smack dab in the way, and the threat of two heavy cavalry regiments bearing down on them made the cuirassiers irrelevant to the fate of the infantry assault.

Well at least the game was fun to play. Fast paced and no head smack moments and nothing illogical reared its ugly head : )

Now I have to put all those figures away...

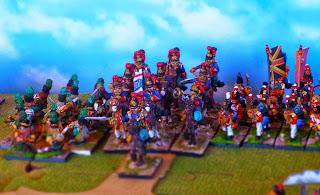
Overview of the field as the French near their high water mark,

The 62nd exchanges volleys while the 21st wavers.

Bourgeois and Donzelot about to break the Allied line.

Looming defeat from the Allied perspective.

The cavalry arrives just in the nick of time.

The Household Brigade
Who is that leading the Dragoon Guards?

The Blues!
Charge of the Royals.
Lead French battalion routs!
Slaying all the way...

Charge of the Greys
The onslaught is unstoppable

That's all for now.

As always thanks for stopping by!


Wednesday, November 13, 2013

D'Erlon's Assault with Muskets and Shakos: Part Two, the Crisis

Here is a link to Part One if you would like a look.

Got in a few more turns today and things are shaping up nicely.


The French advance continued apace, driving back the  ever thinning Allied skirmish line.


All the while the French guns were slowly whittling down the Allied batteries on the ridge.


The French skirmishers soon reached the top the ridge and the Allied gunners withdrew.

The hedge and road were now held only by two under strength Dutch/Belgian battalions and a few companies of the Rifles.


When the first French battalion reached the hedge they were met with an effective volley from the Belgians. The commander of the battalion fell and the unit fell into disorder.

Still their return fire sent the Belgians running...


...right into the Scots who also took flight!


This most unexpected development  left a bit of a hole in the Allied line.


Things seemed to be going my way. With 12 battalions in various states of readiness bearing down on the two remaining British battalions holding the ridge line things really couldn't be going much better.


The British battalions extended right and left to lessen the gap left by the Scots.


My left hand brigade reached the hedge while the remaining skirmishers exchanged fire with the 21st on my right.


The commander of the 21st fell, and his battalion fell into disorder. Unfortunately I haven't any formed troops near enough to capitalize on the event.


The lead battalion of the right hand brigade is now crossing the hedge and exchanging fire with the 62nd foot.


So far things have pretty much followed the historical script. The details have varied but the overall theme has survived. The French are cresting the ridge and heavily out number the remaining Allied battalions  to their front.

Now the stage is set for the British cavalry charge. I finally decided to leave the Lueneberg battalion out of the struggle, so the main change from the historical battle is that the two French cuirassier regiments that will face the Household cavalry will be fresh.

Not sure if that will change anything. I am keen to find out though.

Hopefully more tomorrow.

Thanks for stopping by!

Sunday, November 10, 2013

D'Erlon's Assault with Muskets and Shakos: Part One

Have had this set up on the table since late August. 
Finally got around to playing the pre-game bombardment and first turns yesterday.

French Skirmishers Approach
 There were three turns of pre-game bombardment. 

Both Bilandt's brigade and the leading French battlions (off table at the moment) suffered.

A not very good shot of the Grande Battery and three French
 brigades in the off table holding area.
As it happened I could only scrounge up enough French troops to form 12 battalions rather than the 16 I had hoped to deploy. Yes, I could have used allied troops as proxies or recycled French figures as they became casualties. However as my interest in this affair has always been D'Erlon's unique formation in his attack on the ridgeline proper, I decided to surround La Haye Sainte with a cloud of skirmishers and presume this part of the battle happened as in the books. Lots of smoke and firing, with no appreciable change by the time of the great British cavalry charges.

Bilandt's Brigade under cannonade.
Playing as the French I decided to detach the light companies of all 12 battalions to form my skirmish line. Hopefully this will be enough to overpower the thick Allied skirmish line and still allow my troops to harry the main line on the ridge as the battalions advance. At the same time I hope I have retained sufficient strength in the formed battalions to prevail when they in turn reach the ridge. 

One aspect of Napoleonic warfare I wanted to stress in Mustkest and Shakos was the balancing act commanders faced when it came to releasing men to skirmish or retaining them in the line. Once released you have no guarantee they will return to their parent battalion during play. Throwing out too many skirmishers will overly weaken you formed units. Throwing out too few will permit enemy skirmishers to harass your forces unimpeded.

The French first line enters play.
After the bombardment I "reset" the battlefield by pulling the remnants of Bilandt's troops back to the ridge line. 27th Dutch was well beyond its sell by and I withdrew it from the line. 7th Belgian and 5th Dutch Militia  were each hovering around half effectiveness and so were given shortened frontages to defend.

The Prince of Orange confers with Bilandt.

As the French advanced, the Allied skirmish line was forced back. By the  luck of the dice (several of them really), the Allied skirmishers were able to inflict greater punishment than they received themselves. However French numbers were telling.

Now leaving La Haye Sainte on autopilot so to speak came back to haunt me.

The "problem" such as it is, revolves around the Lueneberg battalion.


As you may recall, dear Reader, the Lueneberg battalion was sent to reinforce the hard pressed defenders of La Haye Saint. Unfortunately for them, they failed to notice two regiments of cuirassiers bearing down upon them.

The rout was complete.

While this is often touted as one of the great successes of French arms on the day (and it is), I have wondered if in the long run it wasn't a rather unfortunate turn of events for France. You see having made this very successful charge the cuirassiers were in a bad spot when the British Household Cavalry Brigade made a charge of their own. 

The cuirassiers were swept away.

This was of course the same charge during which the Union Brigage routed D'Erlon's infantry. Had the cuirassiers not already been committed would these two fresh regiments have affected the outcome of the British cavalry charge?

Wellington weighs his options.

And so this is as good a time as any to break for the day.  

The preliminaries are over, and both sides are poised for the main event.


Not sure when I will take it up again although it might be as early as later today.

Still would love to read all of your thoughts on how to proceed.

My intent is to see for myself how D'Erlon's innovative tactics played out. I think he had taken a rather well though out approach to the problem of assaulting a British position and that it was really a combinations of circumstances that led to his defeat. 

Many others think quite the opposite. 

While using any game to recreate a historical event is fraught with danger in terms of fidelity, I do think this sort of thing can provide valid, if not "air tight" insight.

In any event I do hope you have enjoyed the read and the photos and thanks for stopping by!