Friday, January 25, 2013

Simple Waterfall Terrain

Hello!

Have received several kind compliments on the waterfall seen in Giglamps in the Heart of Darkness.

Thought I would write a short piece on how this was done. It's definitely cheap and cheerful versus master terrain and that by design.

Like many of you, I imagine, space for "one off" terrain items is getting to be a problem. I mean how often am I really going to need a waterfall in my games?

With that in mind I decided against store bought or bespoke terrain making and went with things that were already to hand.

First thing, as always, was to scour the internet for photos of real waterfalls. I am sure we all have a picture in our mind of what a waterfall looks like but is it a detailed picture?

Having never thought much about it before it turned out that mine was not. First the obvious. A river or stream flows off the edge of some steep slope and dramatically falls with a roar onto the ground below.

Really large waterfalls are quite er, foamy, but smaller ones have these characteristics:

1. Looks like a normal watercourse at the top.
2. Spray obscures the actual drop.
3. The falling water is actually quite clear, not being so "deep" (from the horizontal) as it is before or after the fall.
4. Quite a bit of foam at the bottom.
5. Either a pool or just a very fast flow downhill once it reaches the bottom.


Above you can see the ingredients used to represent these effects:

2x Mesas constructed from foam packing many years ago
3x River sections from Miniature World Maker (also many years old)
1x Piece of plastic wrap (believe it is Glad Warp)
Some bits of cotton puffs teased out int irregular shapes


First step: Stack the mesas to get a greater height effect. I wanted a great big waterfall to separate one side of the table from the other. Also place the lower river section running from the base of the cliff.


Second step: Place the plastic wrap. The piece of wrap has to be long enough to overlap both the top and bottom river section. Then bit on the top will go under the top piece while the bit on the bottom will be folded under itself on top of the bottom section.

The wrap itself should be a few layers thick to give the impression of depth. Unless your river is really wide this will simply be a matter of folding the wrap that comes out of the box into a narrow enough piece to not overflow the banks of your river.


Third step (optional): To reinforce the notion that this terrain was impassible I flanked the bottom river section with a couple of escarpment pieces (from Battlefront in this case). It actually looked fine without these raised banks.


Fourth step: Place the upper river section being sure to tuck any excess wrap underneath.


Final step: Place the teased out cotton on the ledge above and at the base of the waterfall to represent the foamy spray.

That's it. Couldn't be simpler.

Hope you found some inspiration for your own terrain needs and thanks for stopping by!

Monday, January 21, 2013

Giglamps in the Heart of Darkness

Giglamps and Co. tramping through the bush.

" Well, you see, Willard, in this war, things get confused out there. Power, ideals, the old morality, and practical military necessity. But out there with these natives, it must be a temptation to be God. Because there's a conflict in every human heart, between the rational and irrational, between good and evil. And good does not always triumph. Sometimes, the dark side overcomes what Lincoln called the better angels of our nature. " -- Apocalypse Now

"But his soul was mad. Being alone in the wilderness, it had looked within itself, and, by Heavens! I tell you it had gone mad. I had - for my sins I supposed - to go through the ordeal of looking into it myself" -- Heart of Darkness

The Station.
Sir Kev Blyng lay dying.

Giggers watched the antics of the faqir through the billowing clouds of incense.

 " Ickity ackity ooh, eh eh!"

The trip up the Bomoo river had been painstakingly slow but otherwise uneventful. Nothing of note had occurred once Colonel Kilpaw had taken B'Water.

"Ziggity zaggity zoo, eh eh!"

Sir Kev had gone mad they had said but nothing had prepared Giggers for this.

" Ooh, ooh, ptht!"

The Station was in disrepair. There were piles of carrots everywhere, mute testament to Sir Kev's success. There were other, less wholesome trophies, testament to Sir Kev's methods. Unsound.

" Ah, ah, ptht!"

For all of that, Sir Kev was an officer, a gentleorc, and the Hero of nGwakia Wells  and that ought to count for something. And so here he was, participating in some native cleansing ritual designed to save Sir Kev's blighted soul.

"Flippity flappity floop!"

The walls of the Station wavered and faded. A feeling of dizziness akin to having played too many rounds of whist while quaffing Madiera seized hold of Giggers. Instinctively he reached for his pistol.

"It is done."

Presently Giggers and company were standing in...it looked like..St. Gothmog Square!

 "Od's Fish, this can't be so" he stammered.

St. Gothmog's Square?
"Please put your guns away Gentleorcs, You have asked me to do this thing and I have done it.

'We are in Sir Kev's spirit and must now act quickly to save it..."


The Table from Past to Present

The Game

This scenario is based on "Occupy: Hitler", an encounter I wrote as part of THW's "Monkey Business"   offering. The game is played on a table representing Sir Kev's soul. In this case it is depicted as a series of places that influenced his life. 

Giggers, The Chief, Chef, Lanz, Mister Kleen, and the faqir, have all entered Sir Kev's earliest key memories. A great rise, and a mighty river led straight down the middle of the table, straight to the Station, where it all went wrong.

Rural Chavchester

On the left the table started with pastural Chavchester, as it appeared before the industrial revolution changed it forever. There was the old barn where little Kev used to watch the farm animals and beyond that up the lane you will see The Tarte and Sweete where little Kev would watch animals of a different kind take their pleasure.

Astute readers will already have seen St. Gothmog's Square. Here a somewhat less young Sir Kev, used to wile away the hours while at college. There was much carousing, and not a few broken windows and noses, as the young "gentleorcs" made fast and loose with those of lesser breeding.

The Ruin of Queen Roo di Shia's Palace.
Beyond the confines of Albion, we find the ruined remains of Queen Roo di Shia's palace. In the aftermath of nGwakia Wells, Sir Kev let his Chavchesters loose on the defeated enemy's property and person.

The Line and the Jungle.

Which brings us to The Line. It can be said that in condoning the slaughter after nGwakia Wells, that Sir Kev had crossed the line between civilized and savage behavior. Here that line is made manifest by a shallow nullah that separates his civilized past from his savage present. 

Beyond The Line, the lush jungle closes in, concealing a native village of the type first protected and a later raided by Sir Kev and his askaris.

The Metaphysical Station.
Finally we come to the Station itself, are a more cramped parody of the same. It is here that Giggers must come to save Sir Kev's eternal soul.

And "what of it?" you may ask, "all Giggers has to do is walk from here to there and it is done".

Not so! There are three Possible Enemy Forces (PEF) that seek to prevent Giggers from his completing this  noble endeavor, and an even fouler foe at its end.

The Tribeshalflings
One represents the tribal halflings that embody the spirit of natural savagery.

The Revelers
Another is made up from the dregs of Albion society, no less savage in truth.

The Slavers Occupy the Station.

The last is composed of halfling slavers. Truly the most savage of them all.


Marching through  St. Gothmog's..
How it all went.

The journey started out easily enough. Giggers gathered up his startled companions and their faqir guide and trudged off towards Queen Roo di Shia's palace.

The Forces of Darkness Converge.
Meanwhile the PEF's meandered, as PEF's will, generally in Giggers' direction. Soon the tribal PEF was observed.

Birds burst forth from the Brush.

And found to be nothing more than some animals moving in the bush combined with some rather taut nerves. 

When it came to the revelers however our heroes were less fortunate.


A gaggle of depraved tavern dwellers rushed the party.

Over the River and through the Woods.
A quick shot from Giggers brought down their leader but the mob didn't seem to care. Soon it came to a clash of arms, cudgels, axes, and tusks versus cold steel (and the odd belaying club).

"Prepare to Receive Revelers!
The fight didn't last long but took its toll.

Revelers Repulsed
When it was all over, both Lanz and Kleen lay in pools of their own metaphysical blood. 

Giggers quickly brought the survivors around and set off once more.

er...Out of the woods and over the Bridge...
As Giggers was leading his party over the bridge, he spied movement along the bank upstream.

Movement 

It was the remaining PEF.

Slavers!
Which resolved into an angry bunch of Slavers.

Slavers massing.
There was a good deal of shooting from Giggers and Chef, and  a good deal of skulking about in the brush by the slavers.

Slavers rallying.

The firing kept the slavers off balance. Their leader was never able to mass them for a rush and in the end they came on in ones and twos, only to be shot down or run off.

Keep on Trekking.
With the last PEF out of the way, the party marched on to the Station.

The faqir, for mystic reasons beyond my meager ability to comprehend let alone explain, bid them proceed while he hung back in the jungle.

With a gasp Giggers, the Chief, and Chef  met their greatest challenge yet.

The Heart of Darkness
Themselves!

Giggers quickly recovered from the shock and dropped evil Giggers with a well placed shot.

Chef fired and missed.

Shots are exchanged.

The Chief charged, only to be knocked down by his alter ego.

More shots and the Chief is down but not out.

Evil Chef fired at Chef and missed.

Giggers to the rescue!
Chef charged evil Chef and brought him down.

Giggers stepped over the Chief's prostrate form to engage the evil Chief.

but who would rescue Giggers?
The evil Chief was one tough son of a gun. He knocked Giggers to his knees and readied the coup de gras. Evil Chef recovered and the two would be cooks circled each other warily.

The Chief!
The Chief recovered and rushed in to cover Giggers. The evil Chief was brought low and despatched. 

Evil Chef brought down Chef and closed in for the kill.

Only one bad guy left.
Recovered, Giggers stepped in and stabbed evil Chef bringing the action to a close.

Good Triumphs over Evil.
Afterward

Once again Giggers was staggered by the rigors of metaphysical travel. When he finally recovered he was once again standing at Sir Kev's bedside.

Kleen and Lanz lay slumped on floor where but moments before they had stood, all attentive.

The Chief and Chef looked on seemingly a bit worse for wear.

Sir Kev looked Giggers in the eye and spoke in a weak voice, "Thank you for saving me from the Horror. The Horror..."

The faqir knelt by Sir Kev's side, taking his hand. After muttering a few words in his native tongue, he spoke to the assembly.

"Mistah Blyng, he dead".


Saturday, January 5, 2013

BILBO DON'T PLAY WHIST!

As noted last time Colonel Kilpaw of Force Lipan's 1st Hare Cav regiment was eager for a game with world famous player Lanz Johnsorc in the Green Dragon Inn, the Burrovian Konga's premiere Whist venue.

Dkatha Bey, the infamous Halfling slaver that made the Green Dragon Inn his home had other ideas.

The following is how it all went down. 

This Slaughterloo game featured three squadrons of Burrovin Cuirassiers, each 10 strong, lead by average "General" Col. Kilpaw. Colonel Kilpaw's staff consisted of Giggers (who as a mere adviser had no real role in the game) and Frogner, the Toadoroni opera singer. 

With the power of his vocal calls, Fogner reduces the morale of any enemy unit within 15cm to suffer a -1 to any morale tests.

Opposing Kilpaw were a heavy Othari Barking Dog with seven crew, and two units each of 20 Aegyptian Hafling Warriors, led by Dkatha Bey, an average General.

I took on the role of Kilpaw and some solo rules I have been monkeying with took on the role of the Bey.


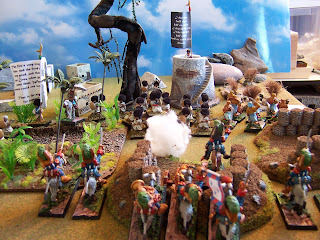
With three squadrons of horse ("donkey" really!), I decided on a fairly text book approach. First squadron under Major Harecule Pothole would lead in line on the right. His mission was to silence the gun.

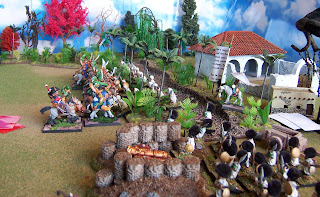
Capt. Peter Cottontail, would lead 2nd squadron also in line and echeloned to 1st squadron's left rear, against the gully full of halflings to the right of the gun.

3rd squadron, Capt. Benjamen Bunny commanding, would be held in reserve, ready to support either forward squadron. I have it on good authority that keeping a squadron of sabres in hand is always a good idea...and so it was.


 The plan almost immediately became undone as I proved adept at drawing "Command Indecision" cards. It became a case of having 1st squadron come to a halt in front of the battery or letting it draw far ahead of its supports. In proper cavalry spirit Harecule kept his conies advancing to limit their time under fire.


In response, Dkatatha moved his reserve warband up to support the gunners.


1st squadron closed the distance and charged! The gunners prudently withdrew behind the supporting warband.


 1st squadron overran the battery...and with a howling cry the hairy footed foe charged!

Quite literally as the crafty Bey produced a "Charge" card that gave his fellahs an enhanced move and +4 to their melee skill. This was not going to be pretty...well if you are a rabbit anyway.

 A very brief scuffle saw the rabbits retreating. Fortunately their donkeys easily outpaced the pursuing warriors.

Disaster had been averted although 1st squadron had suffered quite a few losses.
 At last my luck with the cards changed. Drawing a "Forced Maneuver" and rolling well on the resultant test, 2nd squadron enticed the halflings out of the gulley and into a premature advance.


 As 2nd squadron charged home, the Bey remarkably played a second "Charge!"  card on this his second warband.

Well I can tell you it left me a bit shaken.

Still Capt. Cottontail's conies were able to hold their own and eke out a draw.


 With the issue in doubt the warband that had seen off 1st squadron made a determined rush for the engaged 2nd squadron's flank.

It was here that keeping 3rd squadron "in hand" paid dividends. Capt. Bunny ordered the advance and intercepted the charging halflings.

The melee that ensued was brief and 3rd squadron was repulsed but they had done their job and protected the vulnerable flank of 2nd squadron.


 With their flank secured 2nd squadron redoubled their efforts and did terrible execution among the ranks of the foe.

The Bey's left flank broke and ran!

Capt. Cottontail was able to hold his conies from pursuit but the squadron was still quite exposed, in need of reforming with angry half-pint warriors  on their right rear flank.

 It all came down to who would seize the initiative and Kilpaw lucked out!
 The hastily reformed 1st squadron, despite losses sustained in their repulse from the battery charged once more! This time their target was the very same warband that had counter attacked before. Harecule would have his revenge!

 Being rather ferocious chaps, and aided by the Bey's play of a +2 morale card, it was a near certainty that the halflings would receive the charge. With its strength already defeated this was a near death ride for 1st squadron.

In fact only a roll of 12 on 2d6 would see the halflings retreating.

A 12 it was! Frogner certainly earned his pay this day.


 The halfling retreat led them right in front of the newly reformed 2nd squadron.

Captain Cottontail wasted no time in ordering the charge!

With a crash 2nd squadron fell on the flank and rear of the retreating warband.


The warband broke and the ensuing pursuit was devastating.

The halflings were driven into the river and slaughtered.

The Othari gunners wisely surrendered, offering no further resistence in return for their miserable lives.

Burrovian casulties were heavy, the Hare Cav having lost 8 out of 30 engaged.

The halfling losses were much higher. Some 20 halflings were brought down in the fighting and many more lost to the pursuit.

EDIT: Forgot to mention that the Burrovian forces and the Otters were painted by the wonderful painting staff at Alternative Armies. I must bear responsibility for the Halflings.

Terrain was from a variety of manufacturers.